
Tickets can be sold, reserved, re-edited or recorded for customers via the Sales window. Searches can also be made for customers and their reserved tickets or tickets booked online.
In order to provide a better overview, the Sales window is divided into various folders (Winter, Summer, Storage, Miscellaneous) and tabs (children, adults snowboard, trend sport, private, rental, etc.)

Depending on the offer the courses displayed in the Sales window can be individually adapted in the Item Directory for each ski school. The sequence of the symbols within the respective tab (determined in the Item Directory sheet by folder) can be designed to meet the needs of each user. Left clicking on the required icon and pressing the mouse button shifts an item symbol to another position. Important: Save the positions, so that these remain the same next time you log on to the system. These and other functions can be found in the Icons menu point:
- Organise icons in lines or columns (automatic organisation in lines or columns)
- Organise icons automatically (automatic organisation by serial number)
- Save icon position (saves the organisation of the icons for the current user)
- Accept the icon positions from another user (the organisation is accepted by a freely selectable user, to avoid each user having to establish an order)
- Transfer the logged-on user's positions to all other users (transfer the current organisation to all other users)
- Settings for types of font and line breaks (size, type, item description with or without line break, etc.)
The item or course on sale is selected by double clicking on it. If the  Display dialog icon is activated, a detailed window for ticket sales opens. If the dialog is deactivated, the item is sent directly to the shopping cart. Independently of the icon, a setting per item can be created in the Item Directory sheet.
Sale with dialogue
The customer's data can be entered in the detailed window. If the customer is already stored in the database (because he has already on one or more occasions bought a ticket) this is automatically proposed when the name is entered. If the proposal is accepted, the customer's data already available is loaded into the fields.

Clicking in the Profile line opens the profile stored in the Basic Configuration. The relevant ability level and language are selected by ticking the tick-boxes.
The > symbol displays additional fields for customer data, e.g. the home address or comments on the customer. The address information is of particular advantage for the payment of the invoice.
Course information, such as course period, Meeting Place, Course Duration and Price, are drawn from the data stored in the Item Directory and, where applicable can be adjusted. The saved normal price is displayed in the price field. This price can be adjusted once in the yellow field. In addition, a discount can be allowed – either as a percentage or directly on the absolute amount of the discount. The end price is displayed in the Sales price field.
The number of persons can be adjusted for private courses; the price then changes accordingly. It is also possible in this step for private courses also to select the ski instructor, who will conduct the course. The magnifying glass is used to display only the free ski instructor, who, ideally, fits the profile (provided that the ski instructor's profile has been stored). A tick beside Request identifies the fact that the selected ski instructor has been specifically requested and this should not be changed.
Ticks can be added to or deleted from the Print price and Paid ticket boxes as required. Extension is selected, if the course participant wishes to extend a course. If an extension price has already been entered for the relevant course, the price changes automatically to this amount.
If you want to sell and printout the same course ticket more than once, the required number can be entered in the tickets field. Once they have been saved on to the diskette, the number of tickets displayed in the Tickets field are placed in the shopping cart. The number of tickets does not change the price in the detailed window. The total price increases with each ticket placed in the shopping cart.
Comments on the customer can be added by using the  icons. The yellow symbol generates a Journal comment and the red symbol generates an internal comment. Journal comments appear on various reports, such as the List of Participants. Internal comments are visible only in the Journal for the respective booking. The
  icon allows you to store the customer's credit card data.
Clicking on the diskette saves the ticket and places it in the shopping cart.
Sales checkout through the shopping cart
Tickets, which have been placed in the shopping cart, can be re-edited via the right mouse button menu. Details on this are provided under Editing options in the shopping cart.
If all the tickets are placed in the shopping cart ready for sale, the sale is concluded by the payment procedure. For this purpose, select Checkout to open the Checkout window. This window then displays the total amount of the sale of all the tickets in the shopping cart, which have not been marked as open.

Payment
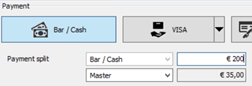
The first step is to select the payment method for the checkout (the selection has a blue background). Cash, Invoice and Others... are fixed buttons for methods of payment. Under Specify favourite (in the illustration VISA) the adjacent arrow can be used to save a preferred payment method, which should then always appear on this button. Other Methods of payment from the Basic Configuration can be found under Others...

Payment split
If a customer pays with two different methods of payment, the respective amount is entered on two lines into split payment (e.g. €100.00 in cash, the remainder (which is automatically calculated) by Visa).
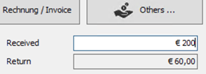
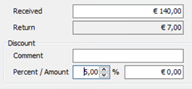
If the amount received is entered on the Received line, the Return line automatically displays the amount of change.
Discount
A discount on the total sale can be issued under Discount. This can be entered as a percentage or as an absolute amount. (However, a discount is calculated only for those items, which have been marked as discountable in the Item Directory sheet properties.) When discount is entered in per cent the amount in the Return line shows the reduced or discount amount. A reason for allowing discount can be stored in the comments field.
Invoice
If the sale is to be added to an existing invoice for a customer or a voucher partner, the relevant invoice can be selected in the invoice section. In this section only open, in other words, accounts, which have not been settled, can be selected.
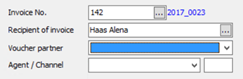
For a new invoice select Invoice as the method of payment and conclude the sale with Print English or Sell. The invoice for the respective customer can be found in the navigation bar under Sales – Invoices.
Checkout
Print English: Normally the sale is concluded by printing the ticket. The data entered are saved in the Journal and the course tickets and for cash sales the receipt is printed. Once the sale has been recorded in the Journal, duplicates and copies from tickets and receipts already printed can be printed again at any time.
Sell: If the sale is concluded, but no ticket has yet been printed, this sale is concluded with Sell. As above, the data are thus saved in the Journal, but no tickets are printed. However, for cash sales the receipt is printed. The original copy of the ticket can subsequently be printed via the Journal.
Reservation: To save the content of the shopping cart as a reservation, Reservation is selected. The tickets from the sale process are saved on a yellow background in the Journal. Since reservations are not concluded payment transactions, it is not possible to print reserved tickets. Nor are they taken into account in the Sales Report and can be deleted at any time by cancelling them. In this process a reason for cancellation is provided and this is displayed in the background.
Create offer: The contents of the shopping cart are designed as an offer. Where there are various course participants a window appears, requesting the receiver of the offer (address). An offer is neither a sales process nor a reservation process. Therefore, the tickets for an offer are taken into account neither in the Journal nor in the Sales Reports. The data entered are saved only as an offer (navigation bar Sales – Offer); from there they can be further edited, reserved and finally sold.

Sale of vouchers
A distinction must be made between two types of voucher: one type for sales and the other for the issue of vouchers. The value voucher relates to a sum of money as a value; conversely, the goods voucher relates to a determined item and it can be used only for that item. Accordingly, the goods vouchers are issued in different ways.
Value voucher
A prerequisite for the issue of a value voucher is an item designed for the purpose on the Item Directory sheet. This is generated as a simple sales item with the designation, Voucher and possibly the relevant value. The Price is subsequently allocated to the value (50, 100, 150 etc.), but can remain on 0. In this way it is possible to define freely the required value during the sale.
For a voucher to be issued the voucher item must be sold via the shopping cart.
Goods voucher
Since the goods voucher refers to a determined item, there is no need in this case for its own sales item. The item, which is to be sold as a voucher, is selected for the goods voucher by right clicking in Sales and selecting Print voucher in the context menu. The name of the guest is then requested and the voucher printed.

However, parallel to this the voucher should be sold as a sales item (see Value Voucher), so that the Journal and the Checkout agree with each other.
If the guest redeems the voucher, the item or the course is sold at no charge (set price to 0) and the receipt no. or voucher no. of the voucher is mentioned in the comment section. This is an important step, because the list of requests must agree with the number of participants.
Sale of season tickets
In order to sell a season ticket, a relevant Item must be installed. The item name should be Season Ticket or something similar. The Duration in the Item Directory properties must be sufficient for the entire season, e.g. 180 days for half a year.

The season ticket is sold in Sales in the usual way, however it must be printed out as Season Ticket in the Sales checkout. To do this, click on the arrow on the bottom near Print English and select Season Ticket.
Season tickets should not be sold together with other items.
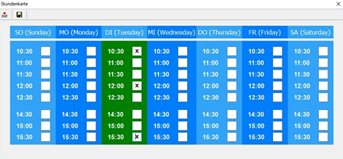
Sale of hour cards
The hourly card can be used flexibly for various time frames. To use it, the guest does not need to participate continuously in a several-day course, but can choose whether or not to participate in the course in half-hourly cycles. At the end of the holiday week the guest has the opportunity to return the ticket and to pay only for the courses, which have in fact been consumed.
An appropriate item must be generated with the activated property, Hour Card in the Item Directory. In addition a printer is required for the hourly card (usually A5), on which the ticket is printed and this is used by the ski instructor to identify the time slot. The Waldhart Software team will be pleased to undertake the generation and configuration of the hourly card. However, the time chart should already be pre-printed on the hourly card.
If the item is available and correctly configured in Sales, during the sale of the item the hourly card is automatically printed as a ticket. Where required, the printing of the ticket can be deactivated in the Item Directory, since the hourly card replaces the ticket.
The ski instructor notes on the hourly card the time, at which the child or the guest attended a lesson. For Report for the ticket or the hourly card the hourly card window opens, into which the crosses on the times are accordingly transferred.
At the end of the course the participant may return the hourly card and be refunded the difference for non-consumed hours. In order to calculate the change, the ticket is called up in the Journal, selected and invoiced under Edit - Hour Card.

At bottom left the non-consumed amount is displayed; this is loaded into the shopping cart with the comment, €...... refunded as a subsequent payment and deficit and then paid out again using Checkout and selecting the relevant method of payment.
Therefore the Journal will show two bookings, but no cancellations:
- original ticket sale
- subsequent payment with deficit

Memory
If the shopping cart has been filled at the customer's request and it becomes apparent before the conclusion of the sale that the customer is currently not able to pay or the sale cannot be immediately concluded for another reason, the use of a Memory is offered. Clicking on a Memory with a grey background, e.g. P1, places the entire contents of the shopping cart on this Memory. The icon now has a yellow background and this signifies that the Memory space is occupied. While the Memory is occupied, sales can continue as usual.
If the customer returns and decides to conclude the purchase, the original contents of the shopping cart are reloaded into the shopping cart by clicking on the Memory with the yellow background. This can now be edited further and can finally be concluded as a reservation, an offer or a sale.
Editing possibilities within the shopping cart
Right clicking on an item in the shopping cart opens a menu for further editing of the sales position.
Allocate customer: The customer sought previously in the yellow search field or the selected customer is allocated the highlighted ticket.
Allocate item: In the case of rental or sales items this can be used to edit the relevant item number.
Allocate group course: All the group courses already generated appear on the calendar. Double clicking on the required group course allocates the item to this course.
Specify details: Opens the Sales dialogue window, in order to edit the stored data. This window is called up by double clicking on the item line in the shopping cart.
Put marked tickets on Memory: It is not possible to place all the items in the shopping cart on a Memory ; this is possible only for the highlighted items. (A message indicates which Memory).
Duplicate ticket: Copies the highlighted ticket as often as required.
Lunch: For the selected items books in addition child-care over the lunch hour and/or lunch.
Appointments: The position is allocated to an appointment (see Basic Configuration). The duration of the appointment has no effect on the course duration entered. It applies only to the beginning and the end of the course.
Profile: Edits the participant's profile in highlighted items.
Course attributes: This is where the course attributes entered in the Basic Configuration for additional information on individual courses can be allocated.
Transfer: This is where a bus transfer for the highlighted items can be added. This is also the place where bus routes, stops and departure and arrival times are stored.
Build set: Once individual products or items, which are components of a set, have been registered in the shopping cart, they can be consolidated into a set. The items are highlighted in the shopping cart, Build set is selected and finally the relevant package is selected. The price is then reduced to that of the package.

Ticket Information: The information entered here is printed on the ticket and can also be viewed in the Journal under Ticket Information.
Delete: Deletes a highlighted ticket - no sale has been generated. In the case of reservations and offer positions, which are carried over, once more a confirmation field opens; this field is used to select whether the reservation or offer is to be saved, deleted or cancelled.
Change to Main Item: Turns a highlighted additional item into a main item.
Reset as Additional Item: Resets a highlighted item as an additional item.
Merge: When a ticket is printed, a main item and various additional items are printed together on one ticket. The tickets required for this process must be selected before the function is selected.
x days earlier: The course start date of all selected items is moved by the number of days specified in the window, which opens (into the past).
x days later: The course start date of all selected items is brought forward by the number of days specified in the window, which opens (into the future).
Select all: Selects all the items in the shopping cart.
Mark none: Do not select any items in the shopping cart; only one line remains selected.
Kommentare
0 Kommentare
Bitte melden Sie sich an, um einen Kommentar zu hinterlassen.